
Beginner’s Guide to Assembling an HTPC
We recently covered some recommended parts for Building a Home Theater PC and today we are taking that one step further by taking you through the process of how you can build your very own HTPC. The process is not going to be identical to what you will experience as parts will vary depending on what you select, but hopefully this will give you the knowledge you need to have the confidence to try. And, as usual, remember that our forums are here to help you if you hit any snags in the process.
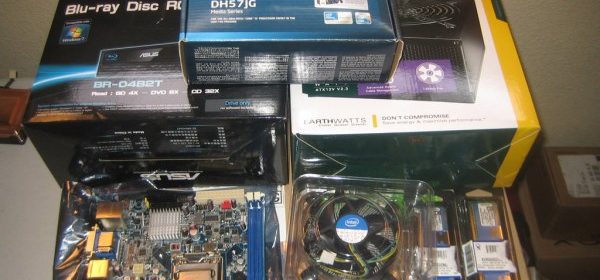
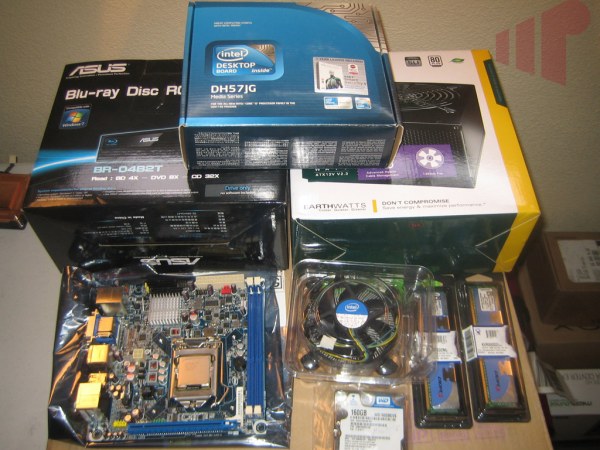
Where Brian went with an AMD-based system, I had some Intel pieces around so that is what will be used here; but the assembly process will be similar enough that there is no reason to feel intimidated. First, let’s cover what components were used for these videos:
| Component | Product | Model |
|---|---|---|
| Chassis | nMEDIAPC Black Aluminum / Acrylic / Steel HTPC 1080P Micro-ATX Media Center Case (MissingRemote Review) | HTPC 1080P |
| Motherboard | Intel LGA 1156 H57 HDMI Mini-ITX DH57JG Motherboard (MissingRemote Review) | BOXDH57JG |
| CPU | Intel Core i3-540 Clarkdale 3.06GHz 4MB L3 Cache LGA 1156 73W Dual-Core Desktop Processor | BX80616I3540 |
| Heatsink/Fan | Stock Intel | Included |
| Video Card | On-Board | — |
| Sound Card | On-Board | — |
| Power Supply | Antec EarthWatts 750W Continuous Power ATX12V version 2.3 SLI Certified CrossFire Ready 80 PLUS Certified Active PFC “compatible with Core i7/Core i5” Power Supply | EA750 |
| Optical Drive | ASUS Internal 4x Blu-Ray Reader SATA Optical Drive | BR-04B2T |
| Hard Drive | Western Digital 160 GB Scorpio Blue SATA 5400 RPM 8 MB Cache Bulk/OEM Notebook Hard Drive | WD1600BEVS |
| Memory | Kingston 1GB 240-Pin DDR3 SDRAM DDR3 1375 (PC3 11000) Desktop Memory (Qty. 2) | KHX11000D3LL/1G |
| Operating System | Windows 7 Ultimate SP1 64-bit OEM | GLC-01844 |
I went with components that I either had purchased previously via some nice deals or managed to come by. And that’s a good point I want to mention here, while having your ideal parts for every component is nice, it is definitely not mandatory. I would have loved to have 4GB of RAM in the system, however, I did not want to waste the 2GB I already had available and for a client system two should be sufficient. The same can be said about my choice for using a 2.5″ hard drive; while they’re quieter and more efficient, I would have loved to have a one or two terabyte 3.5″ hard drive (in case I wanted some special local media), but budget did not permit it. All of these components can be upgraded when it becomes necessary. So without further delay, let’s get on with the building process!
Step One: Setting Everything Up
In this stage, we make sure we have everything together on our build table–not just the components but also every single cable and screw (don’t forget the screwdriver, wire cutters, zip ties!) that we will need to assemble the unit. Nothing is more frustrating than getting started on your build only to realize you are missing a SATA cable (then you end up being impatient and paying too much at Best Buy than you would have from Monoprice!).
Now is also a good time to point out the dangers of STATIC! Since you are working with electronic components you want to ensure that you are properly grounded to avoid any electrical static which could damage your components. If you have an anti-static wrist strap that is the best method to ensure safety, but you can also simply touch the metal piece of any electrical component you have on the table which should ground you as well. As you would expect, handling the motherboard and CPU should be done carefully and always try to hold them by their edges, not under or over any components, avoiding any circuitry. When assembling, try to avoid placing the motherboard on conductive surfaces. A piece of cardboard is usually sufficient. Note that, in general, on their exterior, anti-static bags are not anti-static.
Step Two: Assembling the core–Motherboard, CPU, Memory and Heatsink
The first actual building we will do is to put together the motherboard with CPU and heatsink. I have done this outside the chassis since in our micro-atx chassis things are often compact. It’s a good idea to do this outside even when using a full size chassis to reduce the flex on the board when affixing the heatsink. It should go without saying, but if you are using a heatsink with an under board mount backplate, it’s required to assemble it before installing in the chassis. In the video, I applied thermal paste even though the stock heatsink had pre-applied thermal compound–I only recommend using one or the other, but wanted to show folks how to apply the paste if your heatsink does not have anything–as always, refer to your user manual.
Step Three: Chassis and Motherboard Installation
Part three is getting into the chassis itself–taking a look inside and starting to fit the pieces inside starting with the motherboard. With any build it’s important to make sure the foundation is setup first and correctly; while you may need to move things around later it’s better to get things in place in a specific order.
Step Four: Installing the Power Supply
Installing the power supply is always the most depressing piece for me; up until now, the chassis and components are so neat and organized. When you bring in the power supply with all its cables things can get messy and thus reduce airflow. We went with a modular PSU from Antec specifically for this but you will see it’s still something to be focused on.
Step Five: Installing the Blu-ray and Hard Disk Drives
With all the core components of your computer in place it’s time for the final stages. In this day and age a Blu-ray drive isn’t required–you can always install the OS via USB–but given my affection for randomly wanting to watch a movie anywhere as well as the relatively low cost of the drive, makes them a no brainer. The hard drive is a different story. Going with a 2.5″ hard drive is good because these components cause less noise, but without wanting to purchase a 2.5>3.5″ adapter makes installing it…creative. [Note from Andrew: I’ve made 2.5->3.5 adapters out of cardboard from shipping boxes. It works really well, you just need to make sure that you allow for air flow on the bottom (i.e. cut out a rectangle just inside the mounts). Then use electrical tape to secure the sides to the HD bracket in the case.]
Step Six: Cables and Wrapping up the build
Remember when we mentioned how messy your cables get after installing the power supply? Well, the reason we wait until the end to do anything is because we added cables since then, doing it now saves doing the same job twice. You want to ensure that sufficient airflow goes through your chassis to keep your components cool, and organizing your cables is the easiest way to ensure that. Then, it’s just a matter of putting the lid on, connecting your components, powering it on and crossing your fingers.
With everything sealed and running hold your breath as you power on and wait for the power-on self test (POST) screen from the motherboard. You will immediately want to enter the BIOS (usually with an F10, F2 or Delete button press) and set the motherboard to “Load Optimal Defaults.” Then, you can adjust any additional settings as you deem necessary–such as setting your hard drive to use AHCI. You also will want to check the components for the pieces you installed–make sure the RAM is detected as you expected and the hard drive and optical drives show up as well.
If all matches up then congratulations–you have built your home theater PC and now it’s just software needed, which we will have in a future guide.
You guys are the best
You guys are the best resource on the web for HTPC enthusiasts. Great work on this guide! I just pre-ordered my HD Homerun Prime, so I’ll be shopping around for components during the next two months.
I’d like to add that if you accidentally get too much thermal compound on the chip, it’s easily removed with household rubbing alcohol and a cotton ball.
Good tip. Qtips work great
Good tip. Qtips work great with the alcohol as well.
If you want any opinions or help on your build (or just want to brag ), make sure to start up a thread in the forums.
Have you measured the power
Have you measured the power draw of this build? Would the 750 Watt power supply make the system consume more power than say the 380 Watt power supply listed in the ‘Beginner’s Guide to Building a Home Theater PC’?
The 380W supply is much more
The 380W supply is much more appropriate for a HTPC like the one being built in this guide. Power supplies lose some energy converting AC to DC. You will see efficiency ratings for some supplies such as 80Plus which mean that 80% or more of a supplies energy is successfully converted from AC to DC at a few different load intervals. Power supplies begin losing efficiency especially in their lower range below 20% so a lower wattage supply will save energy compared to a higher wattage one if the additional energy is not required.
I like how you mention how
I like how you mention how frustrating it is being shy a cable when it’s time to put it together. When I upgraded my system recently, the new motherboard’s 8-pin power supply connector was in a slightly different location. As result, my cable was about an inch shy of reaching with everything installed. Thankfully, I was able to pull out the discreet video card and make it work off the built in video and get it semi-up and running while I waited for Newegg to ship me an extension cable. It seems no matter how many times I build systems, something new can always go wrong.