OrigenAE S16V Review

It has been over two years since we first saw the oft-hyped S21T demonstrated at CES. The curved chassis caught our eye and we knew big things were ahead with the "S" series of cases from OrigenAE. Our first look at the "S" series will not be the opulent $1000 S21T but instead the more reasonably priced, but still quite classy, S16V. OrigenAE has been in the case game for a while. Let’s see if they have learned a few lessons from past mistakes.
Specifications/First Impressions
Specifications
-
single piece of 5mm aluminium front & sides
- 2 x 80mm exhaust fans (pre-installed)
-
1 x 92mm intake fan (pre-installed)
-
front media bay, usb hub, audio & firewire
-
rubber isolation hard drive screws
-
IR Trans module or optionally a Philips MCE module
-
support for 4 hard drives or 5 with the use of the HM100 hard drive mount
-
optical drive matching bezel included
-
VF210 VFD/IR Module included
-
Philips RC197 Vista remote included
First Impressions
The case came from OrigenAE’s office here in the US. Everything was packed securely and there was very little chance of any damage during shipping. I always check to see if anything rattles or clangs when unpacking a box. Everything was mounted securely in the case and the accessories were bundled in plastic bags.
| |
|
|
Top Down shot of box |
Front Of Box |
The box is pleasing to the eye and would catch someone’s attention in a retail environment.
| |
|
|
Front of S16V |
Angle Shot |
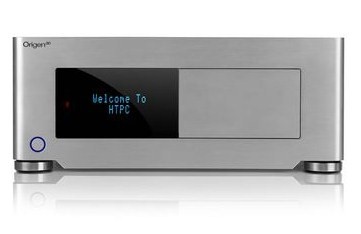
It isn’t hard to see there was a lot of engineering effort that went into building this case. Perhaps the most striking feature is that the front and sides are actually one piece of curved aluminum. It deviates from the rectangle box we so often see, this softens the look a lot and should be a hit in the WAF department.
Card Reader/VFD/Remote
Card Reader
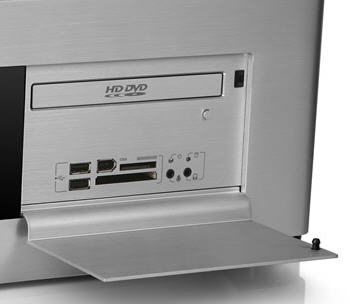
The door folds down to reveal a multi-function card reader and optical drive slot. The card reader will read just about any format under the sun. If you have a particular card that you will be using I recommend downloading the user manual and checking it out.

The bezel included with the case is designed to match the rest of the case. The picture shows an HD DVD sticker but they also included a Blu-ray sticker for the combo drives that are sure to be used. The card reader also has a couple of USB ports, firewire port and front audio ports. The connections for these ports are all modular. If you are not interested in using these ports, you can disconnect the wires from the inside so they do not clutter up your case.
VFD
Below is a studio shot of the 2X16 character VFD. The characters used are larger then other VFDs I have seen to date. However, I would not rate the readability to 10′. In a light environment I was able to read it at 6′ and in a darker environment I was able to read it from 7 or 8′.
More information from OrigenAE can be found here. Readability aside, the VF210 VFD module does offer an MCE driver that picks up the title of the song, picture or movie you are playing. In standby mode, the VFD displays time and date, which I mentioned earlier is readable from 6 to 8′ away.

I was somewhat frustrated with the lack of customization options in the VFD software. I really wanted to make use of the large characters and have it display that time across both lines at all times like a cable box would. As we all know, the cable box has a very important role as a living-room clock. This would be a great addition to the VFD and I hope the make this improvement someday.
Remote/IR
The simplicity and layout of the Microsoft MCE 2005 remote has garnered a lot of praise over the years. It did leave me wondering why OrigenAE went with the new boxy rectangular Philips Vista Media Center reference design remote (model RC1974603). The remote has a similar button layout to the MCE2005 Microsoft remote but extends the button layout vertically. It also loses the comfortable curved peanut-like shape.

The bright side, pun intended, is that the remote is backlit and it offers the same limited universal functions as the Microsoft MCE 2005 remote. Since layout is purely subjective, I would be interested in hearing from the community if they prefer this layout over the MCE 2005 style remote.
The IR receiver that ships with the S16V is made by IRTrans, however, there is an option to mount a Phillips IR controller/blaster module instead, the Philips uses the native Microsoft eHome drivers (Philips makes the hardware reference design so naturally the Windows native drivers work).
I had some minor difficulties using the VFD because I installed the most current driver set from OrigenAE’s support site. Once I used the older driver set available for download, my problems went away.
The Build
Build
Getting started on any HTPC build can be a daunting task. Cramped conditions and poor wiring routes are just a couple of the problems we can face. OrigenAE’s approach to keeping things easy for the end user is pretty obvious and shows through when installing an optical drive. In order to remove the optical drive cage, you have to loosen 4 screws and remove the top one that fastens it to the front of the chassis. They made the screw holes in a figure 8 pattern with one end larger then the other. This allows you to remove the cage without having to fiddle with four small screws. Here are a couple of pictures so you know what I mean.
| |
|
|
Close up of screw holes |
Inside view of front of case |
After screwing down the optical drive cage, I went to installing the hard drive. The space between the optical drive cage and hard drive cage is pretty close. They need to fit about a quarter of an inch more in the case to ensure everything fits just right.
| |
|
|
HDD cage lid, and the 92mm intake fan on the side |
Hard drive with anti-vibration screws isntalled |
The hard drive is mounted on four rubber anti-vibration screws which eliminate all metal on metal contact. After that you simply plunk the lid down and screw it down.
If you fill up all three slots with hard drives, you will be limited on the length of video card you use. From the screw that holds the video card bracket down to the hard drive cage is 240 mm. The length to the back of the cage is 290 mm. If you fill only the back slot up you should be able to fit even the longest cards that are 270 mm long.
There is ample room to route your wires in this setup. I chose to bundle everything together with cable ties and shove as much as I could underneath the drive cages. You can do a lot better then pictured here by used a modular PSU setup and some tie downs underneath the cages. Since this is not a permanent setup, I did not go through all the trouble of really lining things out.
| |
|
|
2x80mm exhaust fans & back of case |
Top down picture of case |
From the motherboard to the top of the PSU is around 120-130 mm. This may limit some of the tower CPU coolers with big fans. The final piece to the puzzle is putting on the lid of the case. Even here OrigenAE has come through and lined the top edge of the case with strips of foam so the lid does not vibrate.
Noise/Cooling/Conclusion
Noise/Cooling
The S16V uses two 80mm fans and one 92mm fan to keep things cool and hopefully quiet. The noise generated by the fans really didn’t add any appreciable noise to the system. The Zalman heatsink was clearly noisier then the case fans or the Seasonic PSU. I systematically stopped each fan to test for noise and found they were inaudible from less then two feet away.
The system as a whole is not the quietest on the HTPC block but it will not be heard in most situations including TV watching. It has a low woosh sound from 7-10′ away but can only be heard if the room is dead silent. There is no weird vibration noise or other higher pitched noise that would lower the WAF.
The two 80mm fans at the rear pull air away from the CPU area. The 92mm fan pulls air in from the side vent up front by the hard drives to keep your drives cool. Like most HTPC cases the expansion card area has to deal with whatever air flow makes it past the CPU area from the 80mm fans.
To give you an idea of how the system cools here are a few stats. This is with a single 7200RPM hard drive, a passive ATI Radeon 9700 Pro, and an AMD Athlon 64 3700+ Socket 754 CPU with a Zalman CNPS-7000 AlCu heatsink using the included FanMate to regulate the fan speed to 3/4.
CPU Temp lid off: 41 C
CPU Temp lid on: 45 C
CPU Temp Torture Test: 56 C
As you can imagine, the more PCI cards and hard drives you stuff in there the temperature is going to continue to go up. I would consider my setup to be 10 C to 12 C hotter then an average modern (65W) Intel Core2Duo or Socket AM2 AMD Athlon X2 setup.
Conclusion
OrigenAE has no doubt put out a very high quality case, easily in the top 2 or 3 of the full-ATX HTPC case market. At the end of the day, you end up with a build that will garner high scores in the WAF department and the geek department. Not only is the case well designed, the accessories and features are nothing to sneeze at.
With all of the things they did right, including quality fans, ease of building, noise isolation. and wire routing there are a couple of things that can be approved on to make it a perfect HTPC case. Though I don’t want half the cost of my case to go towards a good VFD solution, I would think there has to be better solutions on the market. Let my wife have a clock, please. My only other niggle has to be the remote, lets go with the standard remote. However, the supplied remote is certainly better then nothing and gets the job done.
With that said, I do not hesitate to award this MissingRemote.com’s Editor’s Choice award.
Pros
- Noise isolation (anti-vibration screws, foam on lid)
- Quiet intake and exhaust fans
- Full compliment of supplied accessories (card reader, remote)
- Solidly built system (No rattles, or annoying vibration)
- Integrated IR works with no problems (all MCE remotes)
Cons
- Boxy shaped MCE remote (but it works with eHome drivers AND included IR receiver)
- Price – $399 is quite pricey
- VFD solution is better then most due to the size but the lack of customization and the fact you can’t read it from 10′ puts it in the con category. Seriously, a two line clock… No really…
